Wednesday, 2 February 2022

Find and copy files updated after certain timestamp

The ask was simple. I had to find the files which are updated post a timestamp lets say this new year i.e. 01/01/2022. And then copy these files to a different folder. Ideally, it can be done manually in few mins but due to bad habit of over-engineer things, we landed up with the script. 

The reason it turned out to be a really useful script because - 
  1. There were hundreds of folder and thousands of file to work with. 
  2. It extracted the files while retaining the original folder structure. Which means that we can paste this folder back anytime we want and it will only updated the extracted files. 
Sample script 
  $cutOff = Get-Date '01/01/2022 00:00' 
    $source ="YOUR\SOURCE\FOLDER\LOCATION\HERE" 
    $destination = "YOUR\DESTINATION\FOLDER\LOCATION\HERE" 
  #Below line fetches all the files | Then check the last updated time | Then it loops through all the files 
  Get-ChildItem $source -File -Recurse | Where {( $_.LastWriteTime -ge $cutOff)} | ForEach { 
      #Extract the full directory path without file name 
     $actualSource = Split-Path $_.FullName 
    #Replace the root source path with root destination path in order to get proper folder structure
     $actualDest = $actualSource.Replace($source, $destination) 
    #copy file from source to destination 
     robocopy $actualSource $actualDest $_.Name 
}

Sunday, 5 March 2017

Introduction to R

One fine Sunday evening, I was having a casual conversation with my friend, Avinash. He is an R-certified trainer and is providing training for past 2 years. His main area of expertise is in Bio-medical field. He has also assisted/helped students pursuing their Ph.D. in medical research. Looking at his expertise, I have invited him to write some blogs on R here. Hope, we will see more quality content in future for R

Being a Microsoft stack developer, I never really took a keen interest in his technology stack. But then he told me about how Microsoft is supporting R since 2014 and that Microsoft has their own flavor of R.
Microsoft R Open, formerly known as Revolution R Open (RRO), is the enhanced distribution of R from Microsoft Corporation. It is a complete open source platform for statistical analysis and data science.                                                      -- excerpt from the website
So, after his half an hour lecture filled with inspiration, and a couple of hours of googling and youtube-ing, I decided to have at least basic idea about R. It sure looks like one of the top technology for data analysis in the market. Needs no extra settings. Download R-Studio or editor of your choice, and you are ready to get your hands dirty. More thorough articles will be published soon(hopefully by Avinash), But I would focus on the points which took me a while to run or the concepts which were difficult to grasp. Before we move ahead, let me warn you that R is not your regular programming language. It is very crisp and only for data analysis purpose(IMHO).

As R is for data analysis, very first thing you want to have "data" to work upon in your environment. Let's assume, we have a file called aapl.csv which contains daily closing prices of Apple's stock, Each line on the sheet contains a date and a closing price separated by a comma. The first line contains the column headings (Date and Close).to load CSV data in a variable. If we have your file in the current working directory, we can simply use this command.
read.csv - Reads a file in table format and creates a data frame from it, with cases corresponding to lines and variables to fields in the file. 
Output -

To know your working directory (and where you need to put the CSV file), try getwd()
getwd - getwd returns an absolute filepath representing the current working directory of the R process; setwd(dir) is used to set the working directory to dir.

To load files which are not in our working directory, use fully-qualified-file-path instead.


To know about any function in details, use ?FunctionName or help(FunctionName) . For example, to know about head() and tail(), we can use ?head or help(tail) in R-studio.
Returns the first or last parts of a vector, matrix, table, data frame or function. Since head() and tail() are generic functions, they may also have been extended to other classes.
Now that we have data with us, we can do various things and display data in various graphs, charts etc. Data visualization is one more awesome feature of R.
That's it for now. I guess, I will get stuck in R more often than ASP.Net and will have more to explore and write.

As always, feel free to provide your valuable suggestions and comments.

Saturday, 7 January 2017

Automate Excel Operations -2 - Deal with excel using Microsoft Interop


This is the second post of the series - "Automate Excel Operations".
If you wish to take look at previous article, here is the list -
  1. Read Excel Data into DataTable
In this post, we will create some of the functions to deal with excel.
But before jumping to that, We will create a class "InteropHelper.cs". This class will act as a wrapper to interact with actual Interop DLL provided by Microsoft.


Add some Interop properties in this class. This will help us to dispose of all the objects related to Interop DLL. It is very important to dispose the Interop objects properly or else we can get into some serious trouble. We will come to the dispose part a few moment later. These properties are just the one we needed for this post. We can add as many as we require.


And here comes the most important part IMO. Disposing of the objects. If we don't dispose of them properly, there will be an excel.exe running each time we open an excel file with Interop.So do whatever you want, don't forgot to dispose of all the properties you have declared in your code.


Below is the definition of ReleaseObject(). This is how we dispose of ComObject


So let's go with the first one.
1. CheckIfSheetExists - This function allows us to check if the desired exists in the excel file before doing any other operation. This function helps us to avoid the non-informational "HResult" exceptions getting thrown from Interop DLL, I will post the exact exception message once I get one. :-)


2. GetFirstSheetName - In many cases, while reading data from excel, if the user hasn't passed sheet name in function, or first sheet name is not fixed, Use this function to get the name before reading the excel.


3. GetLastRowColumnIndex - To get the value of last row/column where data is present in excel sheet. Note following points -
  • This function does not take into consideration hidden row/column in the sheet. 
  • We remove the filter before calculating the row/column to consider all the data.
  • Blank cells(with no data) are also taken into consideration. (Sometimes, we accidentally add blank rows/columns. For us, there is no data but excel consider these cells as actual data). Try removing unwanted cells if the count is not as expected.


4. DeleteSheets - To delete the sheets in excel file. Keep in mind that we can't just delete all the sheets in the excel. There should be at least one sheet available. That's why we have "forAll" and "defaultSheetName" parameters. Check description in the image below -


5. SetSheetVisibility - To show/hide the sheets in excel file. Keep in mind that we can't just hide all the sheets in the excel. There should be at least one sheet visible. That's why we have "forAll" and "defaultSheetName" parameters. Check description in the image below -


Tuesday, 27 December 2016

Automate Excel Operations -1 - Read Excel Data into DataTable


Disclaimer - Neither Microsoft nor I advise to automate MS Office operations using Interop DLL

But then we don't have much of a choice when it comes to automating such operations. At least, I am not aware of any such tool at the time of writing this post.

Note - Before we proceed any further, let me tell you, from here on, whenever I say "Data", I am referring to tabular data in excel sheet until stated otherwise.

I am planning to write multiple posts and will try to cover one topic in each post. So let's start with the very first point - How to read data from excel file.

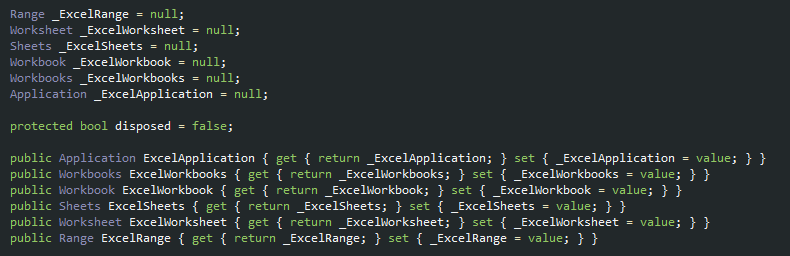
Let's start by creating an empty solution "FokatRnd" and adding an empty class project "CustomInteropHelper" to it. Now add a new class "ExcelHelper.cs" to this. To read data from excel file, we don't need any special tool. "System.Data.OleDb"  namespace will solve our purpose easily.

Declare a connection string that will be passed to OleDbConnection class to create a connection.

public const string EXCEL_CONNECTIONSTRING = "Provider=Microsoft.ACE.OLEDB.12.0;Data Source={0}; Extended Properties=\"Excel 12.0 Xml;HDR={1};IMEX=1\";";
As you might have noticed, we are using 2 placeholders in the above connection string.
1. Data Source={0} ; - Fully qualified path of the excel file.
2. HDR={1} ; - This boolean value(Yes/No) will inform OleDbDataAdapter whether it should treat first row as table header or not.

Next, we will use OleDbDataAdapter to fill the DataTable object with results. DataTable is part of "System.Data" namespace so we don't need to include any other namespace for now. We need to pass the select query into this OleDbDataAdapter object.

string selectQuery = "select * from [SheetNameHere$]";

We need to pass the sheet name of the excel file from which we want to read the data. "*" is used to read all the columns. The query syntax is pretty much the same as SQL query. Take a look at the final piece of code that will read tabular data from specified excel sheet.

public static DataTable LoadDataFromExcel(string fileName, string sheetName,bool considerFirstRowHeader = true)
{
    string connection = string.Format(EXCEL_CONNECTIONSTRING, fileName, considerFirstRowHeader ? "Yes" : "No");

    DataTable objDataTable = new DataTable(sheetName);

    using (OleDbConnection objOleDbConnection = new OleDbConnection(connection))
    {
        OleDbDataAdapter dataAdapter = new OleDbDataAdapter();
        objOleDbConnection.Open();
        string selectQuery = "select * from [SheetName$]";
        dataAdapter = new OleDbDataAdapter(selectQuery, objOleDbConnection);
        dataAdapter.Fill(objDataTable);
        dataAdapter.Dispose();
    }

    return objDataTable;
}
And, that's it. This function returns a DataTable which contains all the data in excelsheet. We can use this tabular data as per our requirement. Go ahead, Give it a try and as always, feel free to improve this article by providing your valuable suggestions and comments.

Saturday, 6 December 2014

Publish Visual Studio Project from Command Line

I have been thinking about this for a long time and finally figured it out. In my current project, our visual studio solution has almost 50 projects. As with any other project, we need to publish it daily and deploy it on the Development Server. Being the laziest developer in the team has its own advantages. I was never assigned to give deployment to the server. :-) But looking at my fellow developers publishing 20+ projects, right clicking on each project, checking publish location, waiting for it to publish then moving on to next project; sometimes removing unnecessary files also. It was such a pain to watch them doing this again and again; forget doing it myself.

So I thought, why not try to create a batch file which can do all this stuff automatically with just one click. "MSBuild.exe" was the key to this problem. So, I created a simple batch file with this command.

YOUR\MSBUILD.EXE\LOCATION\msbuild.exe YOUR\PROJECT\LOCATION\ProjectName.csproj

For example :
C:\windows\Microsoft.Net\Framework64\v.4.0.30319\msbuild.exe 

MyProject\Location\ProjectName.csproj /p:Configuration=release;DeployOnBuild:=False;PackageAsSingleFile=True;Platform=ANYCPU;outdir=YOUR\DESTINATION\FOLDER\PATH;
Don't forget to change the folder location while executing the command.
The /p here denotes the properties related to MSBuild.exe. These properties can be configured as per requirement. For me, the most important property is <i>outdir</i>. This property set the location of the folder for Published Folder.

Once you run this command( if there is no build error), you will find the files it location mentioned in 'outdir' folder. So everything is plain and simple. But one thing was not good for me. All the contents were placed inside _PublishedWebsites folder which was not acceptable for me for no reason. :-)
So I wrote one more command XCOPY to copy contents from_PublishedWebsites folder to some other folder to have cleaner output directory.
XCOPY OUTDIR\Location\_PublishedWebsites\* Final\Output\Location /S /Y
Here /S allow us to copy entire folder structure and
 /Y  suppress prompting the confirmation.

Well, everything was set and I gave that my batch file to my fellow colleague. When he executed my batch file into his system, and checked his output folder. Every published folder was empty to my surprise. When I cross checked everything, I found that he has written some Post Build event in his project property. In that, he has used $SolutionDir variable which my batch file was unable to find.

So, I updated my batch file to pass SolutionDir in the property section of MSBuild.exe. Updated version of the batch file looked more like this.
C:\windows\Microsoft.Net\Framework64\v.4.0.30319\msbuild.exe 

MyProject\Location\ProjectName.csproj /p:Configuration=release;DeployOnBuild:=False;PackageAsSingleFile=True;Platform=ANYCPU;outdir=YOUR\DESTINATION\FOLDER\PATH;SolutionDIR=Your\Solution\Folder
With the above changes, I updated the batch file for maintainability by using variables. So final version of the batch file was like this -
@echo off
:: Set Project Location here
SET ProjectLocation="YOUR\PROJECT\LOCATION"

:: Set tempLocation here. This location is used for Publish Location.
SET TempLocation="YOUR\TEMP\LOCATION"

:: Set Final Location here. This location is used for Final Content Location. 
SET FinalLocation="YOUR\FINAL\LOCATION"

:: Set Solution Directory Location here.
SET SolutionDIR="YOUR\SOLUTION\FOLDER"

:: Create if folder do not exist.

IF NOT EXIST %TempLocation% MD %TempLocation%
IF NOT EXIST %FinalLocation% MD %FinalLocation% 

C:\windows\Microsoft.Net\Framework64\v.4.0.30319\msbuild.exe 

%ProjectLocation%\ProjectName.csproj /p:Configuration=Release;DeployOnBuild:=False;PackageAsSingleFile=True;Platform=ANYCPU;outdir=%TempLocation%;SolutionDir=%SolutionDIR% 
 

:: Copy Required files to Final Location
XCOPY %TempLocation%\_PublishedWebsites\* %FinalLocation% /S /Y 

This is how I did it. I know, it can be done using PostBuild event also. I even tried it but for some reason, it didn't worked well for me. I also know that there are some awesome tools which can perform this same task more efficiently. But, I want it do this way only. Any suggestions? 

Wednesday, 5 November 2014

Override jQuery function for custom behavior (say getter and setter)

A new day and a new, very intelligent idea from the client which he presented to us with great confidence. After we are done with the development of the page, he told us to change the display format of the currency on the change and that to on some of the labels which display amount. So the amount 1000000.00 should look something like 1,000,000.00 in labels. Obviously, we perform some calculation based on these label values. So setting and getting the values for these labels would have been a lot of changes on the script file.

As the changes were for a particular page and the requirement was likely to be change soon ( that's why we say, Experience counts :-) ), I was looking for possible solutions. My initial thought was to create two separate function. One to convert the amount into the desired format and set the value to label. And other one to fetch the value from label, remove the comma and return the numeric value. Problem with this approach was a lot of change in entire code file. There is even chances that i could have missed to call these functions somewhere.

So I thought, why not modify the default text() function of jQuery. That way, I need to write only the extended functions and without even single line of code change in file, I should be able to meet the requirements. So after a bit of efforts, I came up with this code -

<script type="text/javascript">
 
(funtion($) {
        /* Keep original function to execute later. */
        var oldTextFunction = $.fn.text;

        /* Override the jQuery function */
        $.fn.text = function(value) {
            /* Apply this code only to 'span' tags with 'format-amount' class */
            if ($(this).is('span') && $(this).hasClass("format-amount") {
                    /* Setter */
                    if (value) {
                        /* replace orignal amount with formatter amount */
                        value = value.toString().replace(/(\d)(?=(\d\d\d)+(?!\d)/g, "$1,");
                        arguments[0] = value;
                    }
                    /* Getter */
                    else {
                        /* Remove comma from the formatter text. */
                        var formattedText = '';
                        formattedText = jQuery.text(this);
                        if (formattedText) {
                            var find = ',';
                            var regex = new RegExp(find, 'g');
                            formattedText = formattedText.replace(regex, '');
                        }
                        return formattedText;
                    }
                }
                /* Call original function */
                return oldTextFunction.apply(this, arguments);
            };

        })(jQuery);
 
</script> 

That's how, I found the quick fix which is working pretty good till now. Ofcourse, there will be many better solutions to my quick fix. Do tell us how we can implement that.

Sunday, 19 October 2014

Extract All sheets inside a folder to individual Excel File


It was supposed to be a peaceful Friday night in office. As I was about to leave the office on time, I was bombed with a very stupid task. Actually, We had some 8-10 files related to some important data and each Excel file contained 10-15 sheets. The task was to extract all those sheets into individual excel file. For me, to do this manually was like digging the well with spoon. It would have taken hours to complete the task. So I thought of trying hands on VBA. It was pretty easy and quick to do this with VBA and within half hour, I was done with my code and task to Extract sheet to files. (Note that I have written the code from scratch. I found below mentioned code segments on some sites and adjusted it to meet my goal.) Lets see how we did that.

First, I tried to extract the excel sheets for the single Excel file.(Please note that i have written this code. Copied it from this location)
Sub Splitbook()

Dim xPath As String

'Pick current excel path
xPath = Application.ActiveWorkbook.Path

Application.ScreenUpdating = False
Application.DisplayAlerts = False

'Loop through all sheets
For Each xWs In ThisWorkbook.Sheets
    xWs.Copy
    
    'Save excel file with sheet name
    Application.ActiveWorkbook.SaveAs Filename:=xPath & "\" & xWs.Name & ".xlsx"
    Application.ActiveWorkbook.Close False
Next

Application.DisplayAlerts = True
Application.ScreenUpdating = True

End Sub


Well, that works pretty straight. It extracted all the sheets into files(naming sheet name as file name) Now, the next challenge was to loop through all the files in a folder, process each file and loop through its sheets. For that, I created a new Macro-supported file (.xlsm) file. Pressed [Alt] + [F11]. This opens up the code window. In that, go to Menu -> Insert -> Module and pasted these lines -
Sub SplitAllBook()

Dim fso As Object
Dim xPath As String
Dim wbk As Workbook
Dim Filename As String

Application.ScreenUpdating = False
Application.DisplayAlerts = False

xPath = "YOUR_SOURCE_FOLDER_NAME_HERE"

'Pick only ".xlsx" files. In case you want to process older version of files, please change the extension to .xls
Filename = Dir(xPath & "*.xlsx")

'Loop through all files
Do While Len(Filename) > 0  'IF NEXT FILE EXISTS THEN

    Set wbk = Workbooks.Open(Filename:=xPath & Filename)

    'Use fso to remove the extension from file name. We used this name to Name excel file.
    Set fso = CreateObject("scripting.filesystemobject")
    Dim tempFileName As String
    tempFileName = fso.GetBaseName(Filename)
    
    'Loop through all sheets
    For Each xWs In wbk.Sheets

        xWs.Copy
        'I have used naming convention as - OriginalFileName_SheetName.xlsx to avoid name conflict. You can put any logic you want.
        Application.ActiveWorkbook.SaveAs Filename:="YOUR_DESTINATION_FOLDER_NAME_HERE\" & tempFileName & "_" & xWs.Name & ".xlsx"
        Application.ActiveWorkbook.Close False

    Next

    wbk.Close True
    Filename = Dir

Loop

Application.DisplayAlerts = True
Application.ScreenUpdating = True

End Sub

With that, we are done. Run you macro and you should get all the sheets created as new excel files in the destination folder.

Tip -
 
I faced a couple of problems while running the code.
1. Unique Name for files - Figure out a way to provide a unique name to your file or else the macro will throw the error.

2. Folder Path - Define your folder path correctly with all the "\" etc wherever required. In case a problem occurs, a quick debug will solve it easily.

Sample Code

Thank you.